Home décor is my favorite fashion trend. Having an organized and nice-looking place to live never goes out of style. I put off a lot of cleaning and organizing because of the cost of updating, though. New trends come with a hefty cost, and sometimes it just is unachievable on a small budget. I have a great hack for the awesome galvanized pipe systems seen in every magazine, cool store and website. It took me an hour at Home Depot to figure out, but it was totally worth it! Joanna Gaines is jealous of my creation.
You need a half a day, some muscle and about $40.
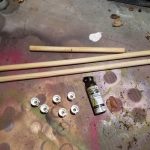
Supplies:
Tape Measure
Level
Large-head wood screws
Galvanized pipe ends, 1½ inch (This varies depending on how you are attaching to floor and wall.)
Galvanized pipe elbows, 1½ inch
PVC female cap and screw
Cut-to-size wood dowels, 1½ inch
Rustoleum Oil Bronze
Steps:
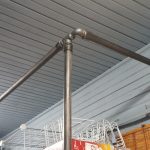
• I needed only a half closet because I was using the system for storage cornered against two walls. I measured how tall I wanted it to be, how long it needed to be and how far out I wanted it to come. My measurements were 8 feet tall, 8 feet long and 2 feet wide. I snapped a couple pictures and headed to Home Depot with my own tape measure and notes.
• I originally wanted to use to the real pipes, but after calculating and actually feeling how heavy the pipes were, I opted for wood. The real deal would have cost me about $400 in total. I wanted to make sure it was steady and could hold at least 100 pounds of weight, so I opted for the wood. You can always use PVC if you are not looking for a weight-bearing system. Head to the trim section and measure out and cut the wood dowels right at the store. Then, head to the piping section.
• Get your galvanized floor brackets first. Then, make sure the elbows fit into the screws. Next go to the PVC pipe section and grab the female sleeves to secure to the ends of the wood. Make sure to open the bags and make sure they all fit. Next, grab wood screws with big enough heads to secure the floor brackets.
• Spray paint all the plastic and wood. You will need at least three coats. Wait at least a half hour in between coats.
• Once everything is dry, put together the dowels, sleeve endings and elbows. You will need someone to help you level the system and hold it in place. Then, screw the brackets to the wall first and floors last.
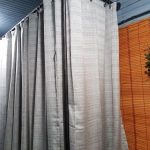
I threw some curtains on my creations, so I could use it as a storage unit to hide crap. But let me tell you, this makes such a huge impact in any room! It looks industrial, but it is light and really easy to put up and take down. It’s a great idea for creating a room divider or a cool storage space in your dorm!
Jamie Burke