I have been planning my best friend’s baby shower for a couple months now. And, of course, Pinterest is my go-to, but it gives me both extreme joy and anxiety. I pin away for hours, fully knowing I will never make the recipe, get the $400 coat or paint my furniture bright pink. But occasionally you come across something that you genuinely think you can pull off without resorting to just going on Amazon and ordering. I found these beautiful giant flowers that you can use to decorate not just a party or shower but also walls or ceilings as home décor. These do not take long at all! You need very little in the way of supplies and only about 10 to 20 minutes per flower, depending on size and style.
Supplies:
Packaged paper (You can use white, colors, all-purpose or fancy cardstock; it depends on what you want for your budget!)
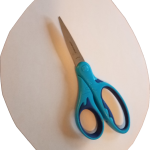
Sharp scissors
Paper plates
Glue gun
Spray paint
Steps:
All the flowers I saw on Pinterest used expensive card stock. It is NOT necessary. Try this with white all-purpose paper first. Once you have completed your first flower, you can figure out your paper choice. I used a $5 package of 500 sheets of all-purpose paper.
Once you have the paper ready, get out your scissors and take one piece of paper and cut a petal teardrop shape. Paper is usually 8 inches by 11 inches. Cut the teardrop shape, starting from the bottom of the 11-inch side. Cut all the way to the top in the petal shape desired. Once you have it cut, make sure you have the shape you want. Then, hold it over a stack of paper and cut-trace it. You need about nine large petals for the bottom layer and eight petals for the next layer.
Now you will want to do some smaller and shorter petals. Use the same steps, just modify the size.
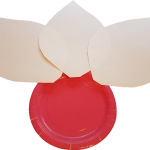
Take your paper plate, and with it facing up, lay out overlapping petals in layers. Put the large petals first on the rim of plate. The next layer can be layered over that, but move the petals an inch into the middle. Then the smaller petals over those, moving another inch in until you fill them in right to the middle of the plate. It should look like one giant flat flower. Now work backwards and take the layers of petals off and keep them in stacks.
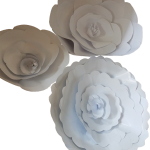
Heat your glue gun and start gluing your large stack (first layer of petals) to the rim. Push down on each petal and move in a circle, overlapping one side. Then, move on to your second layer, and so on. Once all the petals are glued down, you want to work from the top and hold up a petal and glue it to the petal behind it. The petals should start to stand up as you go. Once you finished the top layer, move to the next layer. All your petals should stick up and resemble a flower by the end. For the middle of the flower, you can roll some small petals together or cut strips and glue them down.
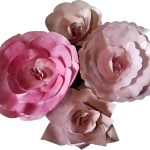
Once you have one flower done, try a different-shaped petal. You can roll the petal ends before gluing them if you want an open look. There is no right or wrong, just cut and layer the petals however you think they will look good. After I had all my flowers done, I took them outside and sprayed them with spray paint. Do a thin layer of paint and use different colors to blend and fill the middle. Once they are dry, you can poke holes in back to hang them or use double-sided tape to secure them.
Jamie Burke